Holley Sniper 1100 instructions
Make sure you read all of Holleys instructions as well as ours, and the video links to help your installation go as easy as possible!
When you install, follow ALL of Holleys instructions EXCEPT do not run the startup wizard, and do not touch the idle speed adjustment screw. We preset the idle speed screw so do not touch that!
Here is a detailed installation video we made:
https://www.youtube.com/watch?v=hVT9caC3HZ8&t=705s
There are changes since this video regarding the fuel system!
If you have purchased our fuel system rather than the Holley fuel system that we used to use the install for that is now different!
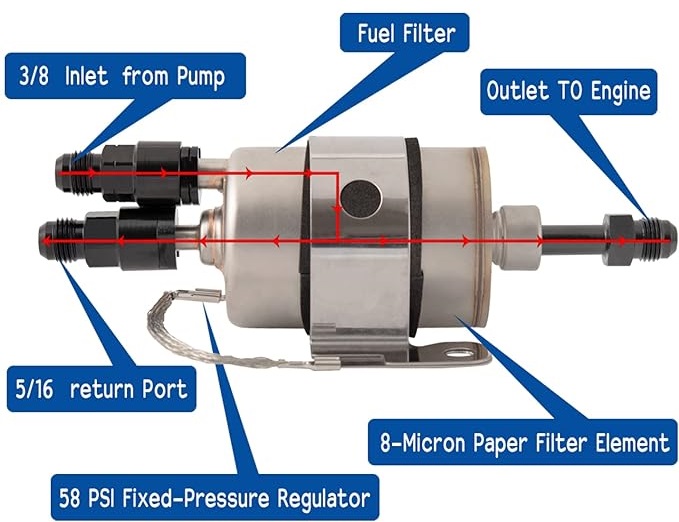
With our new fuel system we only run a single fuel line to the back of the car. This simplifies installation and reduces cost of the extra high pressure fuel line. The new system utilizes the GM LS style fuel pressure regulator/filter. We still only recommend a dedicated return line to the bottom of the fuel tank. We do not recommend using a "Tee" on the bottom of the fuel tank for the return and feed. Although it is a lot easier than welding the included 6AN bung into the bottom of the tank we have seen the constant recirculation of the fuel cause pumps to overheat and loose fuel pressure. The new fuel system puts the entire fuel loop under the fuel tank opposite the brake master cylinder. Using the included 90 degree 6AN fittings you can assemble the pump and filter/regulator into a compact assembly sharing a single bolt to secure it to the floor pan area. Included is the WIX pre-filter as well. Clearance from the fuel outlet with a 90 degree fitting can be tight fitting to the chassis tunnel. We recommend installing the fuel outlet then reinstalling the tank. Install the fuel return on the bottom of the tank in a location that will not interfere with the steering column or the tie rods, etc. The low spot closest to the front bulkhead serves as an easy location to install. On a bus we locate it on the lower left side of the fuel tank near the bottom. On Bay window tanks we have drilled a hole in the panel covering the fuel tank for the fuel line to pass through to the tank for its return.
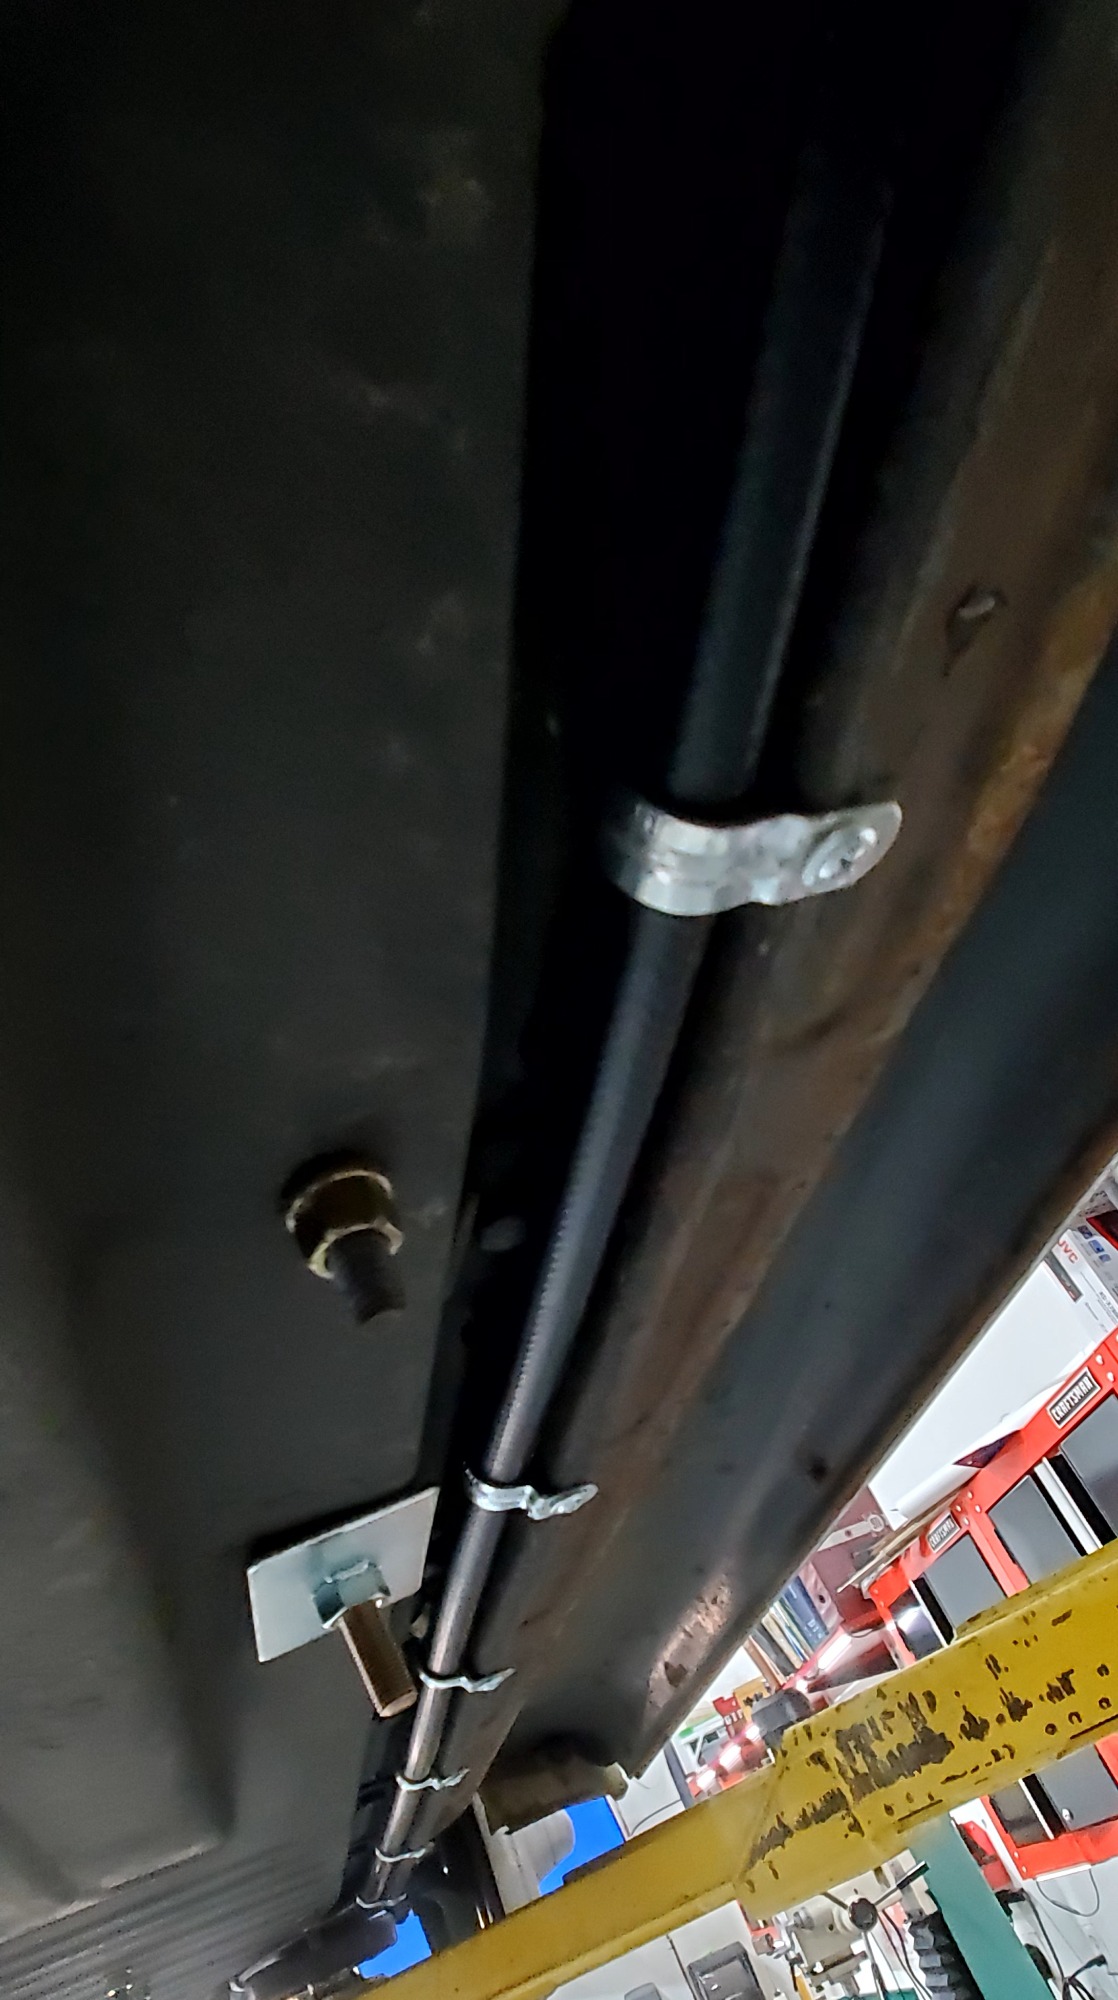
On our installations we run the supplied 3/8" fuel line down the passenger side of the pan, up in the channel that the body to pan bolts reside. We have found if you straighten out a 1/2" conduit clamp and zip screw it to the outer edge of the pan it holds the fuel line up in place (along with the fuel pump wire and CAN extension cable) very nicely and keeps it up above the bottom of the chassis away from harm.
With the single fuel line going into the Sniper, use the supplied 6AN cap to cap off the return outlet of the sniper. This in turn has allowed better clearance to the fan shroud as well.
Once you have the system installed, jump the relay to run the fuel pump and check for fuel leaks. Plug the relay back in and you're ready to fire it up. At this point it is time to load one of your preinstalled tunes from the handheld touch screen. With the key power on you will be at the home screen. Select "File", then "Global Configs". This is where the three tunes are located. All three tunes are identical EXCEPT the idle air/fuel mixture. We provide a 12.5, 13.5, and a 14.5:1 idle air fuel target area in the fuel map. Different engines like different mixtures but we would recommend starting with the 13.5 (most seem to like this most, but you never know!). The screen will prompt you to turn the key off for 4 seconds for the tune to burn in.
Once ready, you should be ready to turn the key to start it up. The Sniper unit will do a priming pulse of fuel shortly after turning the key on. We found the timing to be when the boot up screen first loads, then does a blip on the screen before going to the home screen, that is when the priming pulse fires. We have found a cold start happens much easier if you key on, then crank at the blip for fastest startup. You can crank earlier, it just may crank a couple more times before it starts. Once the idle values are learned in the computer anytime you start the engine while warmed up or recently started it will fire up right away for you.
Once started it should try to idle. The tune may (or may not) be rough on first startup since the system hasn't learned exactly what your particular engine wants yet. Once you hit 120 degrees closed loop will kick in, at 140 the learn function can start activating. The learn is what is actually modifying the fuel map while Closed Loop is the instant correction with no change to the fuel map. At this point let the engine warm and note the Learn and Closed Loop percentages, as well as the Air/Fuel and the Air/Fuel Target. Once idling at the Target, note how the engine runs. If it sounds great, you're set to start driving to tune the fuel map. If you think it could use some improvement after the target matches, you can turn off the engine, key on then go into File, Global Configs, then select one of the other tunes. Load one the same way you did the initial tune and start it up. If the engine is already warmed up it will start aiming for the target air/fuel right away. Once it catches up, note the idle and compare to before, then follow the process again and load the last tune and see how that idles. Pick the idle that idled the best and you're set to drive. The rest of the target fuel map of the three tunes is identical, only the idle target changes.
Here is a video that shows how the closed loop and the "Learn" work so you have a better understanding of how the system works. It goes to closed loop at 120 degrees, and goes to learn mode at 140. It may run rough up to 120 before it starts doing fuel correction but once that kicks in it will start responding and cleaning up the tune really quick.
https://www.youtube.com/watch?v=Su1aTpDh8iY
And here's a video we made for the Holley Terminator system we came out with, but the process is the same. It shows how to change the tunes where we offer three different idle air/fuel ratios. 12.5, 13.5, and 14.5. I start it out with the 13.5 one which is most common, some engines like it, and all most will run on it. With it fully warmed up, try each one and see which one settles that gives you the lowest IAC (Idle Air Control) percentage on the screen when fully warmed up. The lower the percentage, the more it likes it. This is the alternative to basically a lean drop on a carb adjustment.
https://www.youtube.com/watch?v=J_61F1pRq9c
For an air filter in a bus we run the late model T1 bus intake elbow that is all rubber, and have that go to either the stock oil bath filter, or I do a 2" exhaust pipe piece from the auto parts store and put a cone filter on the end of that. The Sniper is slightly larger than the solex, so the rubber filters fit tight right on top.
While the system first learns and adapts to your engine you may run out of learn percentage. General rule for me is anytime I see greater than 20% "Learn" show up on the screen at all it's a good idea to transfer the fuel table. To do this on the handheld start from the Home screen and go Tuning > Advanced > Advanced Learn. There you will see "Transfer Table". Select that but when it asks if you want to smooth the fuel table select cancel. It still transfers the table but it doesn't smooth the whole thing out. On some engines we have found the smoothing of the table takes away some of the learn from other areas. It's not a big deal if you select Yes, but it will work on relearning those areas it smoothed that is didn't need to. Bad wording on Holleys part to say "cancel", it makes it sound like you are not transfering the learn table, but you are.
Pictures posted below as well
Any questions that aren't covered in those video's, let me know
Thanks again,
Eric Allred
Red-E Motorsports
Installation pics
Fuel pump output is on the electrical connection end, here are pictures to help show the fuel system connections, etc